how to photograph diamond jewelry
2010.02 (updated : 2010.08.28)
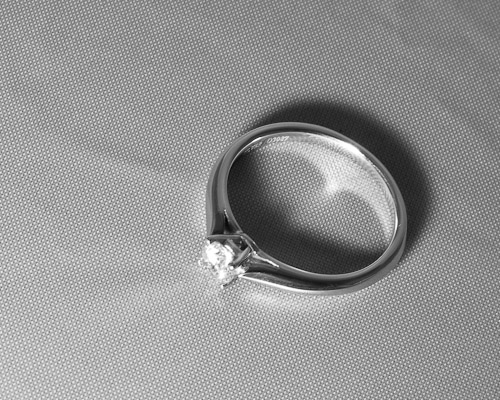
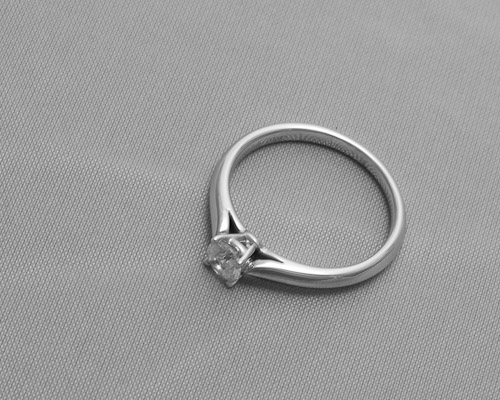
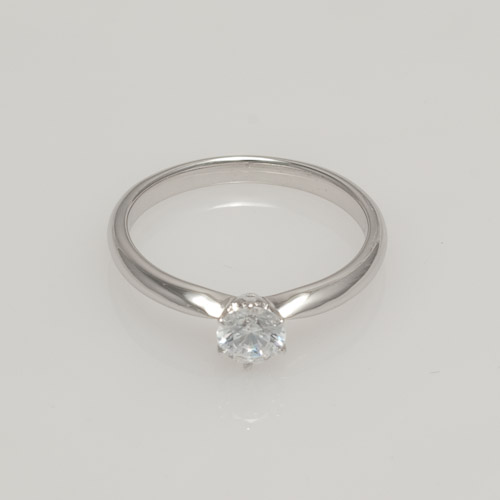
This is my tutorial on producing images like the ones below, which are intended for use in a retail jewelry website. This tutorial involves both a modest studio setup and some exacting photoshop work.
Additional content, added 2010.08—see text in yellow box below.
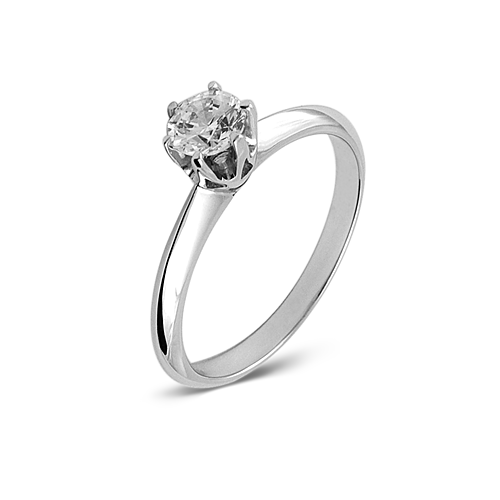 highlighting the ring's design
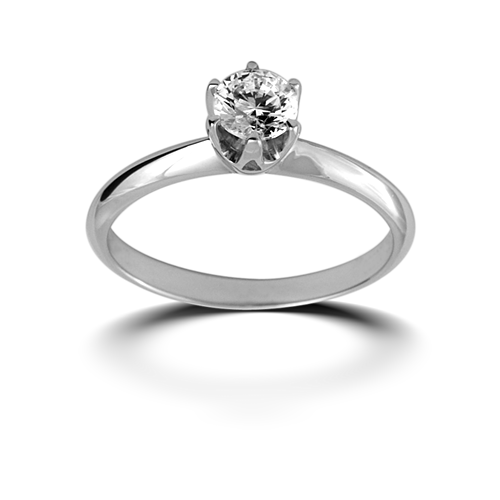 no unwanted reflections or shadows
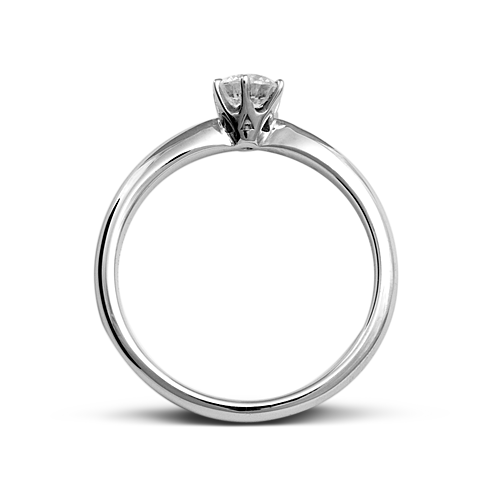 shape and detail!
The main trick in photographing jewelry is to get larger-than-life images that splash the jewelry across the computer screen. These images, to be compelling, must be low-enough in contrast to:
- illustrate the ring from every angle
- show the luster of the setting's surface
- bring out the shape of the ring as well as the details in the ring's mounting
At the same time, the images must:
- eliminate blown-out highlights without introducing any shadows
- flatter the gem stone(s) with bright light, high contrast and great clarity
- eliminate reflections in the shiny surface of the jewelry
- eliminate unsightly dirt, fibres and surface crud
- be free of unsightly things like wax and supports
Putting these requirements together, we see a near-impossible task. How can the setting be low-contrast while the diamond is high-contrast? How do we avoid shadows and highlights? How do we make a larger-than-life image that hides tiny bits of grit and grime that are far too small to see? How do we ensure that the surface is lustrous yet shows no reflections of nearby items? How do we bring out the shape of a piece of jewelry that is effectively one continuous surface of shiny white metal? How can we possibly photograph a piece of jewelry from every angle without using wax or some sort of support to hold it in place?
The answers to these questions took me months to sort out. Happily I had the advice of Richard Thompson, a Toronto-area illustrator and photographer who helped me get my head around many of the largest concepts. Then there was constant research—I studied the work that some really competent people were doing. In the end, it came down to smoke and mirrors: tricky product positioning; the use of strobes and diffusers; and plenty of software manipulation.
cleaning the jewelry
This technique rests on the use of clean jewelry that's free of scratches, lint, fibres (these jam in the prongs), and surface crud. Nothing is worse than spending hours in software fighting with countless microscopic pieces of junk on the surface of a diamond ring. It's far easier to produce decent photographs of jewelry if you've cleaned the jewelry before taking the photo. No amount of post-processing with software can come close to the look of jewelry that was clean to start with. Happily, producing clean jewelry is simple.
The trick in really cleaning jewelry lies in house-hold ammonia cleaner, the type that you usually find with a blue color in a spray bottle with brand names (in North America) like Windex. Simply put a bit of it into a small container and set the diamond jewelry into the cleaning fluid. There's no need to dilute the fluid, nor can the fluid damage the jewelry in any way.
Put each piece into some cleaner for an hour or so, then clean it carefully with something like a cotton-tip cleaner of the variety made for photo equipment; not the household type made for cleaning your ears! When it is clean to your satisfaction (use a loupe or you look at it through your camera's viewfinder) put the piece back in its container to keep it free of dust. Be sure that both the surface of the ring and the surface of the diamond are free of spots.
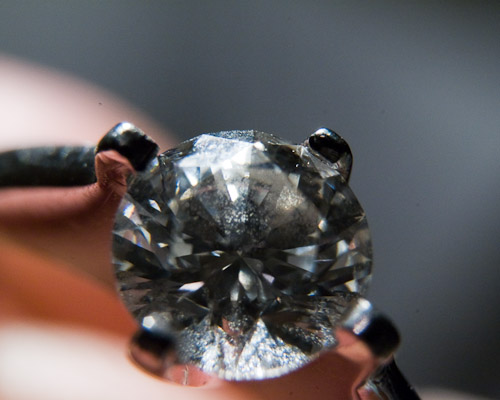 lots of crud on a diamond
Loose dust will settle on the ring no matter what you do (the diamond in the photo above appeared clean to the eye). Have a blower on hand to get rid of this stuff, and use it frequently. You will not see all of the dust that settles on the ring, it is far too small for you to see without magnification. House dust is largely made of human skin, so some of the dust will leave oily residue. If this has become apparent in your photos, get the piece back into the ammonia cleaner for another soak.
Handle all of your jewelry while wearing rubber gloves. These gloves don't leave finger prints or oil stains, and allow you to get a good grip on these small pieces.
do not...
Do not get ammonia cleaner on wood surfaces like tables—it can eat into finished wood and leave a permanently damaged surface, as I unfortunately learned the hard way.
Do not use a soft, fibrous cloth to clean diamond jewelry. It may do an okay job of cleaning the surface of the setting, but it will leave many tiny fibres in the mounting. These can be difficult and even impossible to remove.
Do not use cloth gloves, they will also leave fibres everywhere.
some advice on cleaning gem stones
The following advice is from reader and fellow jewelry photographer brecklundin.
I want to add one word of warning...it is about using ammonia based cleaners (ie Windex) on your gemstone pieces. Many stones are quite porous and will actually act like a sponge or the ammonia cleaner will etch some softer stones or worst, cause cracks. So, you want something milder as well as want to learn what stones can be exposed and/or soaked in a liquid cleaner. I can add more details and reference if ya like... but you were FINE with diamonds.
Oh, want a cheaper and better option to Windex type cleaners? Just use a mild solution of distilled white vinegar along with DISTILLED and deionized water. It will actually clean better and will cost just a few bucks per GALLON to mix up. Just go easy on the vinegar as it's acidic but once diluted will do no harm. The importance of distilled AND deionized water is important in that it removes almost all impurities and minerals from the water so that nothing reacts or clogs the pores in the stones (and some metals as well).
For antique pieces, I find just mild solution of dish soap and water used with a very soft tooth brush works well as you don't really want to remove any patina but want the dirt gone. And almost never soak an antique gemstone (precious or semi-precious) piece in any solution because of potential to damage to the stone.
And even worse, be very cautious of the ultra sonic cleaners, they can be excellent for some pieces but can ruin others.
studio setup
The following setup was assembled on a fairly tight budget. Photography equipment can be expensive, but it's possible to get pretty close to what you need with a fair bit of used and re-purposed gear.
lighting & display equipment
You'll need a variety of lighting equipment. If you're new to strobe photography—as I was at the outset of this adventure—there is some cash outlay required here. Also a fair bit of trial and error. But then again, when do those two conditions not apply?
I cut corners here and there by re-using equipment I already had wherever possible. The star of the show is a simple roll of card-stock paper, so you know I wasn't doing anything fancy!
My list looks like this:
- primary strobe (here I used two strobes with a guide number of 20, but recommend something more powerful)
- secondary strobe (again, I used a small strobe with a guide number of 20)
- soft box
- reflecting umbrella (these aren't cheap)
- cabling for the flash units and a one-to-four cable adapter
- flash triggers that can mount on a tripod
- umbrella stand (I useed a cheap plastic tripod) and light stands (more cheap tripods)
- roll of heavy card-stock paper
Additionally, I used an old plastic drinking container of frosted white to diffuse the light from the secondary flash. In my case, an aging bottle that I'm sure contains the dreaded bisphenol-A!
camera
I use both digital and film cameras for my photography hobby but this work demands digital equipment because there's simply too great a need to check your work as you go. You can't wait for a review of developed film before deciding what works and what doesn't!
Happily, the type of equipment needed for this type of work is minimal if you are producing photos for the Internet. I used this setup:
- aging 6MP digital SLR camera (Pentax *istDS)
- manual-focus 50mm lens (Pentax SMC 50mm/1.4, 75mm-equivalent due to camera crop factor)
- macro adjuster (I used the smallest and least powerful adapter from the set I've got)
- tripod
This gear, though humble, is more than enough for this sort of work.
other gear
I also found it necessary to occasionally use the following items:
- wax to hold the jewelry in place (very small amounts)
- a blower and a soft brush
- rubber gloves (kitchen variety)
- scotch tape
- thin, oblong black shapes to set next to the ring to create black reflections
arranging the equipment
The first step is to get the jewelry onto a piece of white card-stock paper. This is heavy paper that has no surface texture at all. It's thicker than construction paper for instance, and is much stronger. In most cases, you won't need anything to hold the jewelry in place, as you'll simply be setting the jewelry upon this paper. The photos below, while interesting, show a piece of jewelry simply sitting on the floor of the soft box with no paper: unusable due to textured reflections in the ring's surface.
 ring sitting in soft box under different lighting
This piece of paper is first placed into a soft box, which is deployed to diffuse the light from your sources and to eliminate reflections. I used a length of 20cm wide paper that was about 60cm long in a softbox that was 45cm x 45cm x 45cm. Allow the paper to curl up under the camera lens, and to rest on the rear wall of the soft box. This will eliminate foreground reflections and give a nice neutral background for the shot.
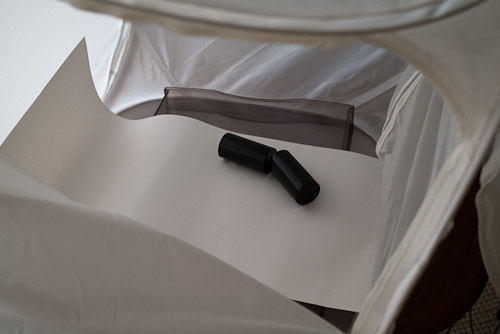 white paper lining the soft box (with Brio blocks for black reflection)
Since the soft box cuts out a lot of light, you'll need strobes (bright lights that flash for a brief period; I used cheap flash units) to provide an intense flash of white light. Strobe light tends to be pretty harsh, though, even through a soft box. This causes shadows and blown-out highlights. So a further diffusion is necessary, and I used a photography umbrella (a reflector shaped like an umbrella) to do this. The trick here is to provide a light source that's larger than the jewelry piece being photographed.
I set the primary strobe (in my case, two flash units mounted on a tripod) above the right edge of the soft box and pointing up at the reflective umbrella. This created the large light source I needed, and resulted in shadow-free, low-contrast images.
The secondary light source was about a metre from the left side of the soft box, aiming at the softbox and tucked inside the frosted drinking vessel. This strobe created a highlight in the front-left side of the jewelry.
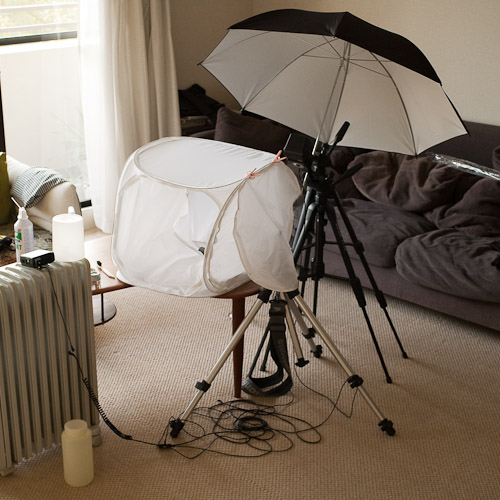 my home studio (no cable management evident)
I then placed the jewelry in the three positions that I'll explain below. It's important to note that in each case I had something small and black close to the jewelry so that a black reflection appeared on the jewelry. This controlled reflection causes the dark lines you see in the photos above. They help define the shape of the jewelry rather than yielding a continuous grey surface.
In this case I connected an adapter to the hot shoe on my camera and strung a PC cable from that to the one-to-four splitter. From the splitter I then strung more PC cables to my three flash units. Cabling and fiddly adapters are always fun to deal with, but in this case simple twist-ties are enough to get these lightweight things out of the way.
positioning the jewelry
The view below is essentially impossible to create without some very finicky work with wax or some kind of supporting structure. I went through days and even weeks of experiments and all I got was waxy-looking photos with strange lumps of wax hanging around the jewelry.
standing nicely, hard to photographIt's worth remembering that this ring is about 2.5mm thick, 13–15mm across, and has a stone that's only 30 points. At this size, it doesn't take more than a 1mm x 3mm x 2mm lump of wax to look like an enormous wodge of garbage. Of course, such a tiny piece of wax is also quite useless at keeping a piece of jewelry in place! Below are some examples from early in our experiments. Note the build-up of wax, the drunken lean to the jewelry (and the poor control I had back then over reflections)!
 wodge of wax
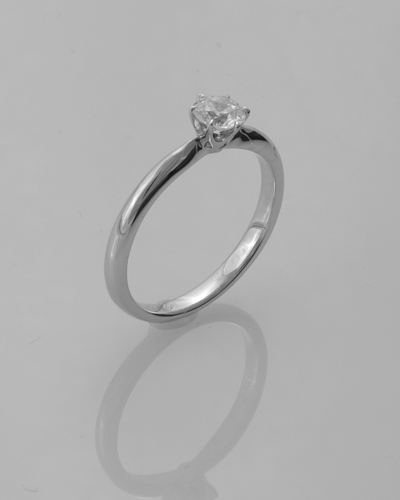
drunken jewelry, visible wax
profile
Upon carefully studying the jewelry photos that I found on the 'net, it became apparent to me that the best work was actually shot with the ring lying down on its side. This was going to be difficult for me to shoot with the equipment I had (for a time, I envisioned hanging the camera into the soft box from above) but then the answer came to me.
I arranged a white business card at a ~30º angle by taping it to a small wooden object. I then used a tiny piece of wax (no more than 1mm on a side at most) and rested the mounting against the wax. The wax prevented the jewelry from moving, and allowed the jewelry to self-centre itself: it was essentially hanging from the wax.
I then positioned the camera to look down at the jewelry at a complementary angle with a resulting 90º view. This allowed me to keep my existing light setup with modest modifications. I also placed some of my son's Brio blocks near the jewelry, taping it to the business cards. This caused the black reflection you see on the left side in the image above. I'll get back to this image in the post-processing write-up below.
"standing" rings
The following photos are also tricky to create. The first thing to dismiss is any idea that these can be created with the jewelry piece standing up. Aside from the unholy nightmare of trying to balance tiny pieces of jewelry on vanishingly small pieces of wax, the relationship of jewelry, camera and lights just gets too tricky to deal with. Shooting jewelry from above interferes with the lighting, and I wound up with lots of shadows such as in the photo below. It's also awkward to arrange a camera on a tripod above a soft box.
 shot from above
By the twentieth time you've watched a piece of jewelry fall over or look crooked or pick up lint from the constant handling, you'll swear off that approach for good.
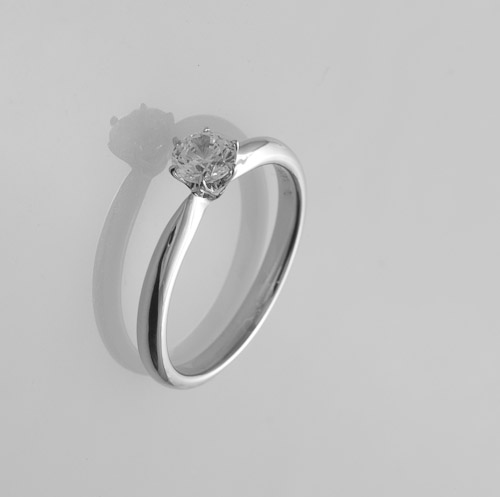
The answer, again, is to simply arrange the angle you want by lying the jewelry on the paper. The first photo at the top of the page was made by lying the ring down on the paper with the stone pointing toward the camera. The second photo was made by lying the ring down and angling it toward the left (and into the light of the secondary strobe).
The camera was placed at a low angle and quite close to the jewelry. Again, I used some black Brio blocks (small cylinders) near the jewelry, taping these in place to give a long black reflection. Following is a raw image showing an early result with this technique. Note that this photo predates the final move to the paper surface as well as the use of strobes.
 shot lying on acrylic (with an LED picking out the stone)
The rest was done in software. The first step is to rotate the image so that it looks something like this—well on its way to a "standing" appearance.
 step one: rotate
That's it. Two or three months of daily tinkering, trials and communication with an expert. All boiled down to a twenty minute read! I'd appreciate any feedback and insights into this technique, as well as any questions pertaining to anything that's not clear.
reader comments
I'm glad you found it useful, Harry. If you've got any suggestions for improvement I'm all ears. 8^)
Thank you very much for sharing this wisdom. I'm developing my product photo skills but have, until now, found jewellery to be nigh on impossible. Thank you again.
Yes, I agree it is maddeningly difficult. For some reason I thought I'd be able to tackle it myself. My early results were very disappointing and while I made some progress on my own I suppose eventually came to accept .. 'acceptable'.
Happily, our test group demanded something better and my partner thought of putting some questions to Rick (on the other side of the world) who put me on the right track.
Hi great tutorial, just wondering how you lose the camera lens reflection, thanks.Marty
Hi, Marty, thanks for the feedback. I was shooting through a soft box, so most of the camera was hidden from the ring's shiny surface. Only the lens itself pops through, and even that was sitting atop the long piece of stiff card-stock paper that I was shooting on (it curled up in front, under the lens, just as it curled up out of sight in the back). I would then try to ensure that the lens wasn't reflected in a particularly noticeable location on the ring's surface. Also, I was using a fairly small lens, an old manual-focus item with a fairly small front element and overall diameter.
Wiping out any stray reflections is always possible in Photoshop, but to tell you the truth I didn't find it necessary when taking care with the placement of the objects in the image.
Standing a ring using wax is indeed tricky & messy. Here's what I do. It uses no wax and works with every size and width ring: Take a hard surface (wood, plastic or metal)and drill a 1/16" hole about 1/8" deep. Take a 1/8" drill and (by hand) chamfer the top of the hole slightly. Level this surface and stand ring over the hole. The ring will stay upright, and even though the bottom is slightly below the surface, it won't show in your photo.
Thanks for the advice, it sounds like a delicate but fruitful technique.
excellent tutorial! now if only I had a diamond ring ^_^
Great Jewelry design ! Really nice ! I like it. Thanks.
Thanks for the comment, sir! I see you're with Clipping Path. Thanks to you for the good work your team did on our images.
This is an amazing and useful tutorial. Thank you so much. I work full time as an antique jewelry photographer with no training on the subject and it is so hard to find information like this. I pretty much gave up on getting standing ring shots with wax and I love your angled technique. Now how to you achieve those perfect shadows??
Thanks for the feedback. The shadows were dropped in on another layer in photoshop. I was given a couple of hand-made "shadows" by a professional illustrator friend.
Thanks for the information! So glad I decided to check out your site; this will come in very handy. Very well written and illustrated.
I'm glad you were able to make use of it, Edith. Please pass on any suggestions or improvements you might discover.
The diamond looks black. How do you prevent that?
It does indeed. In our case we were building an interface with minimal colour and we were aiming for a desaturated look. I found the use of a clip-on LED light with a "snoot" made from electrical tape helped make bring out some fire.
Thank you for the tips and techniques.. now to get to work! I think you missed a key ingredient from your list :) patience.
That's a very good point! 8^)
Thanks for your comments.
Are Brio blocks glossy or matt and will it matter? Ed suggested hole to support any ring. Most rings are top heavy and will not easily balance as I tried and could not get a single one to stay. An old bar trick may work here. Sprinkle grains of salt and they will assist in balancing but providing side support. carefully blow excess away to remove the visible unwedged grains, supporting grains will stay. It always worked with salt shakers balanced on an angle. It's easier than it sounds when done.
Sounds like fun! But I found that simply photographing the jewelry on its side and righting the image in software was far more effective than manually propping the ring into the desired position.
Thanks for the information, do you have any ideas on taking photos of diamonds only (not as part of a jewelry piece)?
Diamonds are damn hard. I never had much luck photographing the stones directly, but have to admit that I didn't take it too far because my focus was on the jewelry. I did find that I could get somewhere by shooting with a tight snoot on the strobe, in an otherwise dark environment, and lots and lots of experimentation. I did try some work with a cheap laser penlight and found that great for bringing out "fire" but it's damn difficult to capture.
Do let me know if you sort it out!
This is what I always use and it comes out perfect http://howtohacklife101.blogspot.com/2012/02/how-to-clean-your-jewellery.html I use the one with the shampoo
Thanks for your comment as well as the tip, Jessica. I've been warned off of the ultrasonic devices for good, though, having heard too many stories about stones being knocked out of alignment.
Thank You for Your advices. Using the wax was driving me crazy :). For me Your tutorial is the most helpful from all that i found in the net. Thank You once again and I'm going to put your advices into practice... Sorry for my poor english.
I'm very glad that you found it useful, Adam. The wax method is a dead end, isn't it.
(And your English is fine! The only Polish I ever learned was "jedno piwo")
thank you so much for sharing the technique :)
My pleasure, I hope it's helpful to you.
Let me know when your site's out of construction; there is some nice work on the main page from what I can see at this point.
Always learning man. Great article! I hope my customers will understand that dirty products make long Photoshop hours and imperfect results!
Very glad you found it useful, Jules.
hmm how about some photoshop tips? great tutorial btw!
Thanks for the comments. What is this Photoshop of which I hear so much? Certainly nothing for which I have a license. ;^)
What are you thoughts about shooting a ring that doesn't go 360 degrees? The bottom of the shank may be shot separately and layered in using photoshop. I haven't tried this myself but I was thinking about trying it. It would be a good solution, if it works that is, to have a holder that is notched out like a ring gift box, sponge covered with card stock, take the picture with the bottom of the shank missing and then take another picture with the ring upside down so it is easy to match together with photoshop. Great tutorial by the way, thank for doing this.
That's an interesting idea. I found that any kind of holder for the jewelry at all wound up being reflected in the metal and left strange lines that ran against the shape of the piece in weird ways. I've seen this many times in the jewelry photography I've seen since. But I'd be interested to see your results, especially how it works out with turning the ring and stitching the results in photoshop. Would you mind sending along a pic of two once you're happy with it?
Oh, so much efforts! Really appreciated. Are the clients ready to pay top $ for all the efforts involved? in most of the cases for the e-commerce based websites, they hardly have any funds in place for the photography of their artificial jewelry.
I developed this procedure for my own e-commerce site, which is now defunct. I agree, performing photography for other sites would probably be a difficult way of making a living.
Hi Michael, Thank you for this article. I have been wondering for years looking at jewelery catalogs how in the world they managed to take pictures or upright rings without wax. But I will have to say that the technique you mentioned here will not work for everybody. First of all, you did not get any shadow of the ring on the acrylic base (or you removed it with photoshop). So it was easier for you to rotate the image and make the ring appear upright. Secondly, you had your ready-made shadows to place them just under the ring with the help of photoshop. And this will not work when using black acrylic or glass to give a reflection of the ring. I tried your technique, but without the ready-made shadows and a very soft shadow of the ring on the base, I could not get your effects.
Thanks for the feedback, this is the first time someone's presented such a case. I can certainly see the difficulty, and if possible, I'd recommend asking a Photoshop whiz for some advice. Perhaps a forum for people who make a living with such things? I suggest this because I needed assistance from someone in that line in order to accomplish what I did.
And you're quite right, I removed every bit of the surface of the acrylic using a "clipping path" in Photoshop. In truth, I outsourced it to an outfit in India which at the time charged only $1 for each image. You can find them here:
http://bit.ly/1dxzIfs
Barring that, can I ask why you're using black acrylic? Are you looking for a certain effect, for instance a broad black reflection on the ring's surface? I tried quite a number of different surfaces, including different colors and textures, but ultimately decided that to control the appearance of the rings I had to use a white environment and selectively add black elements for reflections that would highlight the shapes.
It's now been about 4-5 years since I was working on that diamond ring business (which never took off); I'm glad someone's still finding this technique worth a try.
Hi Michael, Great efforts and thanks a lot for sharing. i'm working in a diamond firm and on diamond photography experiments are going on. yet have not succeed but trying everyday to do something. your tutorial is very helpful and i would like to try this way. as in a diamond firm, generally we took diamond photos by using USB cameras connecting through the microscope. i would like to be in touch with you. and would like to know your email address. thanks, keep going ahead. sameer
You certainly need to use some form of micro- or macro-photography to do this work, it's true. I believe I had a lens reverse-mounted for the macro-effect when I did this work.
Let me know if I can help with any questions.
Good advice. I'm still working on this technique. Unfortunately I have very bad lighting and I always have the unwanted shadow.
It took me three months to develop this technique, Marie. Keep trying!
Hello Michael, I am wondering if you would also know how to take images of the inside of a diamond instead of a jewellery. I need to take photos of the diamonds insides to show its clarity. Thanks
Good day, sir. Off hand, I can't think of a way to do this with most modern photography equipment. Back in the manual focus days we might have reverse-mounted a lens to get the magnification – but with today's auto-everything lenses I'm not so sure. I have seen such images from diamond producers, so it must be possible; perhaps they have special equipment for the purpose.
Good question!
Hello sir im Amandeep Singh from India I want to learn diamond jewellery photography. actually sir im photographer but im always fail to click the diamond jewellery. Im trying so many time but mostly same ruselt pls help me
Most of what I know is on the page you found & commented on. I found jewelry photography to be a terribly difficult task, but I'd be happy to help if I can.
What do you want to know?
Fantastic tutorial. Really well done and I am sure that the lessons contained here will improve other aspects of photography as well. Thank you for sharing this. All the best. David.